Monday, January 17, 2011

Sweet Treat Gift


Look what my wonderful, talented, sweet sister made for my birthday! Ooooh, she knows how I love chocolate.
My reaction?
1. Ooooohhhhhh, yum!
2. Did you MAKE this?
3. You are Soooooo good.
4. I love you!

So, yes, I pretty much immediately knew that I would have to slowly disassemble it to figure out how it was made (and of course share that info with you). I took photos as I took it apart, and here they are in reverse to show how to make one.


Begin with one large and one small styrofoam circle. Cover them in a color of tissue paper that coordinates with your ribbon (that way if it peaks through, it still matches!).

My sister cut a circle of cardboard to cover the bottom of the larger, tissue-covered circle. This may not be absolutely necessary, but it sure looks neater.
Attach the chocolates around the outer edge with pieces of two-face tape. After they are in place, wrap a rubber band around to hold them in place. This will be covered up by the ribbon later.


Place a few candies around the top, leaving the center uncovered.

Stick a few toothpicks in the middle to help attach the top circle.


Put a few toothpicks in the bottom of the "top", smaller circle, and press onto the base.


Surround the top layer with yummy squares in the same way the bottom layer was done...and top with a few more.


Leave a tiny spot open in the middle, and push a toothpick in there, too.


Wrap a layer (or two!) of ribbon around the base, and attach with two-face tape or glue dots.

Repeat your ribbon-wrapping magic on the top layer, too.
Tie a small piece of floral wire to the bottom of a ribbon bow. Attach the bow by wrapping the wire around the toothpick.

VOILA!
Now, if I can think of someone who deserves one (and don't we ALL?) for Valentine's Day,  I might just attempt a pink and red version. Let me know if you try it!


Gettin' Krafty With Itgiveaways


Monday, January 3, 2011

A Extra Minutes = A Lot of Saved Time

A few years ago, I decided to make coordinating wired bows for my staircase banisters, mantle, grandfather clock, etc. So I took the financial plunge (with coupons, of course) of purchasing quite a lot of good quality ribbon and got busy with my floral wire. Several evenings (and sore fingers) later I was pretty proud of my accomplishment.

So I think it's understandable that I take a bit of extra care in storing them. Each year, when I take them down ("boo" to putting away Christmas decorations!) I stuff them with fresh tissue paper. Any that were made in special sizes (a bit larger for the mantle and clock) are marked with paper tags labeling where they are to be placed the next year. Not as OCD as you might think, really.


I also have numerous garlands that swag up two levels of staircase, and overlook bannister, mantle, playroom windows...you get the idea.
I tag these with placement in the same way as the bows. Long slips of paper slipped through loops or around branches with reminders about where they go. Last year, I even marked the tops of each "swag point" with a colored paper clip. Wow, I loved not having to measure those lengths this year.
I can't tell you how fun it is to open these boxes each fall to find nice, fluffy bows and ready-to-go decorations. It doesn't take much more time than just packing them the old-fashioned way...but it makes them a LOT more fun to open and use the next year!

Sunday, January 2, 2011

Where Did December Go?

Oh, how often I thought of ideas to post during the Christmas season...but the act of actually DOING the crafts and activities took precedence over POSTING about them. Ah, well...the best laid plans. My family and I did enjoy the holidays, and we hope that yours did, too. 
My daughter had two elves visiting her this year, sending reports back to Santa about her behavior. Harriet and Lizzie Beth managed to get into occasional trouble themselves whenever they were treated 
to sweets, but it was all in good fun. 
My daughter danced in "The Nutcracker" for the first time this year, so that kept our weekends hopping, getting to performances. It was a wonderful experience. I favorite performance was at a retirement home. The residents were so excited that the girls were there, and fascinated with their costumes.

Our Girl Scout Brownie troop went caroling at a retirement home, and handed out candy canes and cards. Don't know who had more fun, the residents or the girls. Guess it's a toss-up!

We made LOTS of jars to Christmas cookie mix for teachers, coaches, the postman and friends. Everyone seemed extra-excited that there were M&M's involved. I've been wanting to do mix jars for the holidays for years, but this is the first time I actually got my assembly line up and running. Glad that I made the effort, because they certainly brought smiles!

 White chocolate-covered Oreos, with candy corn noses and icing eyes and smiles. Need I say more? This plate was empty in NO time!


We change up our mantle decorations each year, so I made a felt "icicle" scarf and brightened it with a bit of spray mount and LOTS of glitter. But my favorite addition this time around was the apothecary jars. They're just so cheerful. Now, convincing my daughter that they were for DECORATION ONLY for a couple of weeks was another matter!
At the beginning of the holidays, I read about a new book titled "365 Thank Yous: The Year a Simple Act of Daily Gratitude Changed My Life", by John Kralik. I pre-orderd it through Amazon, and it has finally arrived. (It was only released a couple of days after Christmas.) The thought behind the book is the difference it can make in your and others lives by simply expressing gratitude for the small and big things in your life. I decided that's a worthwhile (if a bit imposing) resolution to add to my list for this year. One note a day...to someone...anyone...to say thanks. The postman, a kind store clerk, one of your former teachers, a friend, the list goes on. And I can honestly say that I've stuck with this resolution so far! HURRAY! O.K., O.K., I know it's only January 2nd, so that only means two nots so far....but, hey! Take pride in small victories right?
So let's take on this new year and do wonderful, creative, fun things, and spread the love. I'll be turning 50 in a couple of weeks so I'm especially determined to make this year a contagiously joyous one.

Wishing you and your loved ones a fun-filled, exciting,
safe and happy 2011!

Shibley Smiles Sunday Blog Hop

Tuesday, November 16, 2010

Wordless Wednesday - Just Breathe


Sharing snapshots of life with:

Tuesday, November 9, 2010

Gift Idea Easy Enough for Kids to Make

Since my Brownie troop is working on their sewing try-it and the holidays are approaching, I thought I would have them make something warm and cozy to keep or give as a gift. Fleece scarves! And luckily, many of the local fabric stores have been having sales on fleece...just watch for the ads.

Supplies:
2 colors of fleece, 2 yards each (this was enough to make about 11 scarves)
thread
sharp scissors
sewing machine
Cut the fleece in 6 inch strips, the full width of the fabric. Pair and layer one of each color, and sew a single line down the center of each pair. It's already starting to look cozy!
After reviewing scissor safety with the kids have them make cuts on both sides of the scarf, ALMOST to the center line of stitching. Remind them not to snip THROUGH the stitching. My group cut little strips about the width of one or two of their fingers and they looked great.
It takes just a bit of time (about 30 minutes if you're singing and telling jokes during the process) and patience, but they loved the results (and got very creative with different ways to wear them!).
10 girls + 20 busy hands=10 great scarves and a happy leader!

Join in the fun at:
Pink Hippo Party
The Boardwalk Bragfest


Monday, November 8, 2010

Kids' "Primitive" Angel Yarn Doll Ornament


My daughter and I had a great time yesterday spending the afternoon make yarn dolls and yarn doll ornaments (her idea). This is such a great craft project for kids, and can be used as small gifts, ornaments or package decorations. 
I tend to forget that not everyone knows how to make these little people, since I learned as a child too. When we made "witch" yarn dolls (see photo below) for our mother daughter book club, I was reminded that not only kids...but some adults have never learned to make these little treasures. And that both can have such a good time with them because they're "do-able" even for non-crafty types.
So here goes:


Find a small piece of cardboard or plastic (the height you wrap around will determine the height of your doll), and begin loosely wrapping yarn around it. For this particular angel, I wrapped 150 times around. You can do less for a "Biggest Loser" version of an angel...I just like mine "plump."

Slide a short length of yarn underneath one end of the wound strands and tie it to secure. This will be the top of the doll's head.

Gently slide the yarn off of the cardboard.


Hold the "head end" of the lengths, and tie another short piece around where you want the neck to be. Figure this out by how large, visually, you want your "head" to be. (Or rather, the angel's head...)

Separate out a few strands on each side to become the arms, and tie at the wrists. Then trim the loops at the ends of the arms to create the pom poms for the hands.
Next, tie a waist for your little figure, and cut open the bottom loops to form the skirt.

Need hair? You can make a little wig in the same manner. Wrap the yarn around a narrow strip of cardboard, and knot on one end. Slide the loops off and cut open the loops at the opposite end from the tie.

Insert a little yarn underneath the tie at the top of your figure's head, and use it to tie on the wig. Then "style" as desired.


The wings are simply two pipe cleaners bent into wing form and tied on the back.

You can always make her a bit fancier with a ribbon belt, googly or stitched eyes, or dip the bottom edge of her skirt in glue and glitter. We used to add pipe cleaner halos when we were little, too.

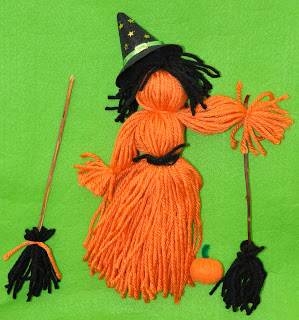
As promised, here's the witch version we did for Halloween.

One skein of yarn, a pair of scissors and cardboard can make quite a few of these and keep the little ones crafting for a while.
I'm linking up with the fun at: