


My daughter and I had a great time yesterday spending the afternoon make yarn dolls and yarn doll ornaments (her idea). This is such a great craft project for kids, and can be used as small gifts, ornaments or package decorations.

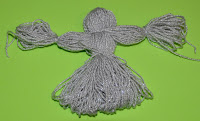
 I tend to forget that not everyone knows how to make these little people, since I learned as a child too. When we made "witch" yarn dolls (see photo below) for our mother daughter book club, I was reminded that not only kids...but some adults have never learned to make these little treasures. And that both can have such a good time with them because they're "do-able" even for non-crafty types.
So here goes:
Find a small piece of cardboard or plastic (the height you wrap around will determine the height of your doll), and begin loosely wrapping yarn around it. For this particular angel, I wrapped 150 times around. You can do less for a "Biggest Loser" version of an angel...I just like mine "plump."
 Slide a short length of yarn underneath one end of the wound strands and tie it to secure. This will be the top of the doll's head.
Gently slide the yarn off of the cardboard.
Hold the "head end" of the lengths, and tie another short piece around where you want the neck to be. Figure this out by how large, visually, you want your "head" to be. (Or rather, the angel's head...)


 Insert a little yarn underneath the tie at the top of your figure's head, and use it to tie on the wig. Then "style" as desired.
The wings are simply two pipe cleaners bent into wing form and tied on the back.
You can always make her a bit fancier with a ribbon belt, googly or stitched eyes, or dip the bottom edge of her skirt in glue and glitter. We used to add pipe cleaner halos when we were little, too.

One skein of yarn, a pair of scissors and cardboard can make quite a few of these and keep the little ones crafting for a while.


I'm linking up with the fun at:


that witch is adorable! love it!
ReplyDeletethanks so much for stopping by the cape on the corner, and for your sweet comment on my harvest decor. i truly appreciate it!
You have great ideas for kids crafts! I love the witch! :)
ReplyDeleteThanks for sending me well wishes! I am feeling back to normal! :)