Monday, February 22, 2010

Spell It Out!


Happy Make Your Monday!


A friend's daughter recently redecorated her room and asked if I could make something with her name on it.

The colors she chose were brilliant, and fun to work with so I took a pillow sham to Michael's and purchased a few matching acrylic colors. While there, I also bought six 4x5" canvases (one for each letter),a wooden dowel, two wooden end caps, and a pair of wall hooks. I then stopped into the local fabric store to pick up a couple of packages of white bias tape and some cording to complement the color scheme.

I primed each canvas with white paint. While they were drying I played with different fonts on my computer, and printed out the letters.

After the base coat dried, I gave each piece a couple of coats of color. This was a good time to add the end caps to the dowel (which had been cut to 24" in length). A bit of wood glue secured them, and then it got the same painted procedure that the canvases received.

Now, there are MANY new super-cool ways to transfer letters and designs these days, but I just did it the quick-and-easy, old-fashioned way. I gently sketched pencil lead across the backs of the pieces of paper, then flipped them right-side-up on the canvas for a quick trace.
I used black paint to apply the lettering, but a nice, fat Sharpie would have been easier.

Again...drying time...

The finishing touch was to edge the pieces with bias tape with the help of good ol' hot glue.
I cord was cut into equal lengths, and the ends stapled them to the backs of the canvases.

Then...just hang the letters from the dowel!

Such a quick project, and the little girl loves it!


Now I'm trying to think of a word to do for my studio!

Friday, February 19, 2010

Climb Aboard Trendy Treehouse's "Follow Me Friday"

Trendy Treehouse (one of my favorites) has a great "Follow Me Friday" feature that will lead you throughout blogville on an adventure of finding different blogs and making new friends. Give it a try and see what you discover!
The Trendy Treehouse


MckLinky Blog Hop

Happy Friday Follow!


MckLinky Blog Hop


Here we go on the Friday Follow. It's a great way to discover new blogs and make new friends. See what you can find when you follow along!

Friday, February 12, 2010

Heat Up Valentine's Day with a Quick Gift!


I guess I just can’t leave well enough alone. Valentine’s Day is just a couple of days way, but something in me needed to make a couple more “tokens” of affection/appreciation.

It’s been so cold and damp here that I immediately thought of the soothing relief of hot packs. Simple enough!

There are many “how to’s” across the internet about how to make microwavable styles with either rice or dried beans. One thing I have learned is that the legumes (because of their larger size) tend to hold the heat longer.

If you decide to whip a few up for yourself, be sure to use only all cotton fabrics and threads (since microwaves and polyester don’t play well together.

I made small packs, for a sore neck or shoulder, beginning by cutting 20” x 5” strips of muslin. Fold in half, bringing the two short ends together. Sew along the long sides, so that the piece is connected on three sides, and open at the top (short end).

Fold in thirds lengthwise, and sew along the two folds (which results in three “tubes” open at the end).


Roll an index card into a funnel to direct the slippery little beans into the tubes. Don’t fill all the way, since the pack will be more comfortable when flexible.

After the tubes are full, fold the opening end over twice, an stitch down securely. There! now you have the heat pack itself finished. Easy, huh?

But we have to make it a bit prettier, don't we? Next comes a little slipcover that can be removed for washing. You can even choose material with motifs that reflect the personality of the person who will be receiving this cozy gift. The one above made out of pink Girl Scout try-it material is for my Brownie daughter.

The cover fabrics should also be cut in a strip, just a bit larger than the muslin. I cut mine 21" x 6". Then, even with the seam allowances, it will still have plenty of room to slip over the pack.

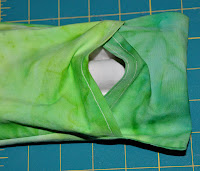
First, fold the two short ends of the strip over twice and stitch to make hems. Then, with right sides of the fabric (design side facing design side) together, offset the ends and stitch up the sides. Think of an eyeglass case with a fold-over flap. Overlap the ends on one side of your case, and finish stitching the sides together.

Turn case right-side-out, and slide your hot pack inside. (See the lil' guy peeking out?) Fold the last flap closed, and you're ready for gifting.

Remember to attach a tag letting the person know that the hot pack can be heated in the microwave for about one minute, and that the cover is removable for washing.

I think I'll test one out right now....aaaaaaahhhhhh!

Have a cozy Valentines Day.

Wednesday, February 10, 2010

Valentine Treat - Cute & Quick


I've been seeing this project posted all over the internet the last few weeks, and just had to try it for myself. Luckily, the first time I saw the post was just after Christmas, so I was able to scoop up a couple of boxes of mini candy canes on clearance at Target. And I love that they are "fruit flavored" (yes, I tried them...they really are), just in case anyone is still burned out on peppermint from the holidays.
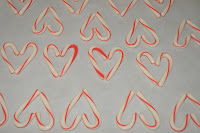
Lay out pairs of candy canes to form heart shapes on a parchment paper covered cookie sheet. Position them far enough apart to leave room to place the lollipop sticks after cooking.

Place the sheet in a 300 degree oven for about 5 minutes. The canes will be just pliable enough to pinch together at the top and around a stick at the bottom. I protected my fingers with a small piece of parchment since...no surprise...the candy is very hot!

After wrapping them in small cellophane bags, I used some small foam hearts my daughter had left over from making valentines for tags.

The entire process of making the lollipops, wrapping and labeling them only took me about an hour and a half. Boy-howdy do I love fun projects that are quick, too!

If I were making them for my girlfriends, I would dress them up with ribbon or rhinestones on the bags. To display them on a dessert bar, you could cover a block of foam, and stick the lollipops in (like a little candy garden). So many fun options.

If you try it, let me know how they turn out, and how you "dressed" them!

Monday, February 8, 2010

Learning About "The Great Olympics"

I love being a Girl Scout Brownie troop Leader! I have just as much fun as the girls do learning about new things, crafting, connecting with international troops, being outdoors, doing philanthropy projects, taking field trips and gaining new skills.

If you’re a Brownie leader (or an elementary school teacher!) the try-it books (try-its are the current earned badges for Brownies) are a wonderful resource for activities. But the oppor
tunities certainly don’t stop with those 60-some-odd options.

Certain Girl Scout councils offer “Council’s Own” try-its in an amazing array
of topics. These programs are developed locally
across the U.S., and most are available to be shared with other councils. Mythology, bats, chemistry, election processes, Renaissance times, candy making, oceanography and volcanoes are just a few of the 100’s of choices.

Our Brownies will be earning a timely try-it next week: “The Great Olympics” from the wonderful Virginia Skyline Council. http://www.gsvsc.org/

Here’s an overview of the badge requirements, and websites that provide all the source materials needed to accomplish them. I hope that whether you’re a leader, teacher / homeschooler, youth leader or mom you’ll find them fun to try with the kids in your life.

"The Great Olympics"

The first Olympics were held in Greece in 776 BC to honor the god Zeus. Now the great athletes of the world participate in Olympics every two years, alternating between summer and winter games.Find out more about the Olympics by completing four of the following activities.
1. Find out about the first Olympics.
• In what events did the athletes compete?
• What clothing did they wear?
• What prizes were awarded?
• Who participated?
• Who watched?

For a well-written, kid-friendly version of Olympic history, visit:

2. The symbol of the modern Olympics is five joined circles. Find out what the colors represent and draw the symbol.
An explanation of the rings and why the colors are significant is at:
and for directions for an inexpensive (love that!) craft to make their own set of rings, go to:

3. Draw a picture of at least 10 sports played in the modern summer and winter Olympics. OR Play Olympic Charades. Act out the sports in the Olympics and see if your friends can guess the sports played in the modern summer and winter Olympics. List of sports (summer,winter or all)
A complete list of the sports can be found at: http://www.olympic.org/en/content/Sports/

4. Find out about a modern female Olympic champion and her sport.

The photo slideshow of women Olympic champions makes a great visual.

5. Learn about a sport played in the Olympics that you know nothing about. How is the sport played, how many are on a team if it is a team sport, and how are points scored?
• Look for a book in the library.
• If it is the time of year for the Olympics, look in the newspaper or watch
the Olympics on TV.
• With your parent’s or leader’s help
, go to the Olympics website.

6. Each country in the Olympics designs uniforms for its athletes to wear. Design and draw a uniform for the United States team to wear in the opening ceremony or in their
individual events.

Adorable paper doll and clothing templates for their own designs can be printed from: http://www.makingfriends.com/f_Friends.htm

7. Hold a mini-Olympics with your troop, complete with opening and closing ceremonies. Participate in at least three different sports and acknowledge the first, second, and third place winners with awards that you make. Adapt the events to your skills. Try team and individual events. Check Safety-Wise for safety standards.

Here's a plan containing easy events, awards and more that kids will truly enjoy:

Nice "toppings" for your plans...

A simple overview of the Olympics:

Don't forget the 2010 Mascots and a cute kid-friendly website: http://www.vancouver2010.com/mascot

Lesson plans:

An if your participants are Brownies, just contact the Virginia Skyline Girl Scout Council at the website mention above to order the try-its! They're the next best thing to a gold medal.

Saturday, February 6, 2010

Posting Time for Classroom Valentines

It's time again for kids to decorate boxes (shoe, oatmeal, cereal, etc.) and bags use for collecting their classroom Valentines cards and treats. Some schools have specific guidelines or just let the kids create them in class. This year, my daughter's second grade class was asked to bring in a decorated shoebox. Because she is very into electronics at the moment, she wanted hers to look like an ipod. Here's what it turned out to be:

Just for fun, I found some other ideas across the internet.

Family Fun came up with a giggle-inducing monster made from a tissue box. Open wide! http://familyfun.go.com/crafts/chews-a-card-824819/

Boys or girls would love to have their name on this adorable puppy. The pattern can be found at DLTK. http://www.dltkholidays.com/valentines/mdogbox.htm

Since bear hugs are a good thing to share for Valentine's, you might consider this happy little bear from Making Friends.

http://www.makingfriends.com/winter/bear_valentine_holder.htm

But my absolute favorite (so far) this year is the hardy pirate ship by My Party Bug. Can't you just imagine your little swashbuckler beaming with pride when carrying this into the classroom? http://www.mypartybug.com/blog/?cat=6

Whatever design they choose (even if it's stickers on a bag) Valentine's is a great chance for kids to show their friends they care. Have fun, and Happy Heart Day!

Friday, February 5, 2010

Follow Me Friday


MckLinky Blog Hop

I have enjoyed surfing around on the Follow Me Fridays for the last couple of weeks that I thought I would "officially" join in! So here is wishing everyone a fun weekend, and happy surfing!

Thursday, February 4, 2010

Something for the Genealogist in Me


Please forgive the lack of posts lately. I hope to share some of the projects with you that I have been working on in the next few days. There is just so much inspiration out there with all of your creative ladies...it's difficult to decide what to try first!

In the meantime, I'd like to share with you that I have started a blog of a totally different kind. "Fireflies and Family" will definitely be my main focus, but my new "Class of 1927" will keep the genealogist in me satisfied. You can
find it at http://classof1927.blogspot.com/

So I hope to see you in a couple of days with a new tidbit for Fireflies, but until then, here's the first posting (which can also be found at the above address:

On my way home yesterday, I decided that I deserved a few minutes of down time. I thought that poking through an antique shop was just the thing to do the trick.

Winding through the maze of rooms at “Hole in the Wall Antiques”, I happily browsed through cabinets of china, bins of costume jewelry, and stacks of ne

w and old books. I filed through a small basket of antique photos, looking for any identifying names on the backs…but no luck. It always makes me a bit sad to think of pictures like these that should be with their families.

Just as I was about to leave (shockingly empty-handed!), I spotted an old yearbook. Oh, no. I have a weakness for them. And it was from a small Texas college in the 1920’s. How fun is that? I flipped through the pages, trying to talk myself out of buying a book that I had no personal connection to, but it was no use. To me it seemed to be page after page of mysteries to be solved. It’s the genealogist in me. It’s a sickness.

So up to the register I marched with this thin brown book.

“Buying ancestors?”, one of the ladies behind the counter asked.

“No, I have quite enough of my own. I just couldn’t resist.”, I replied.

I pointed out to the shopkeepers that it was from Tehuacana, Texas, and asked if either of them had ever heard of it. After exchanging a good laugh, they admitted that not only did they not know where it was but they couldn’t even pronounce it.

No matter. My friends don’t call me the Google Queen for nothing. I knew that I would find out exactly where it was (or had been) as soon as I got home to my laptop.

Background F.Y.I.:

Tehuacana is in Limestone County, Texas at North Highway 171 and FM 638. 6 miles northwest of Mexia (pronounced “ma-hay-a” for those of you unfamiliar with the quaint town), 6 miles east of Coolidge, 41 miles southeast of Hillsboro, 46 miles east of Waco and 36 miles south of Corsicana. In 2000, the population was 307. So there! It does still exist. Unfortunately I can’t say the same for the college, but more about that later.

So here I am: a strange yearbook in my hands and lots of little mysteries to solve. I hope that you’ll want to come along on the ride (however short or long it may be), and perhaps…just perhaps…someone out there trying to climb their family tree will find some little tidbit I run across to be helpful.